
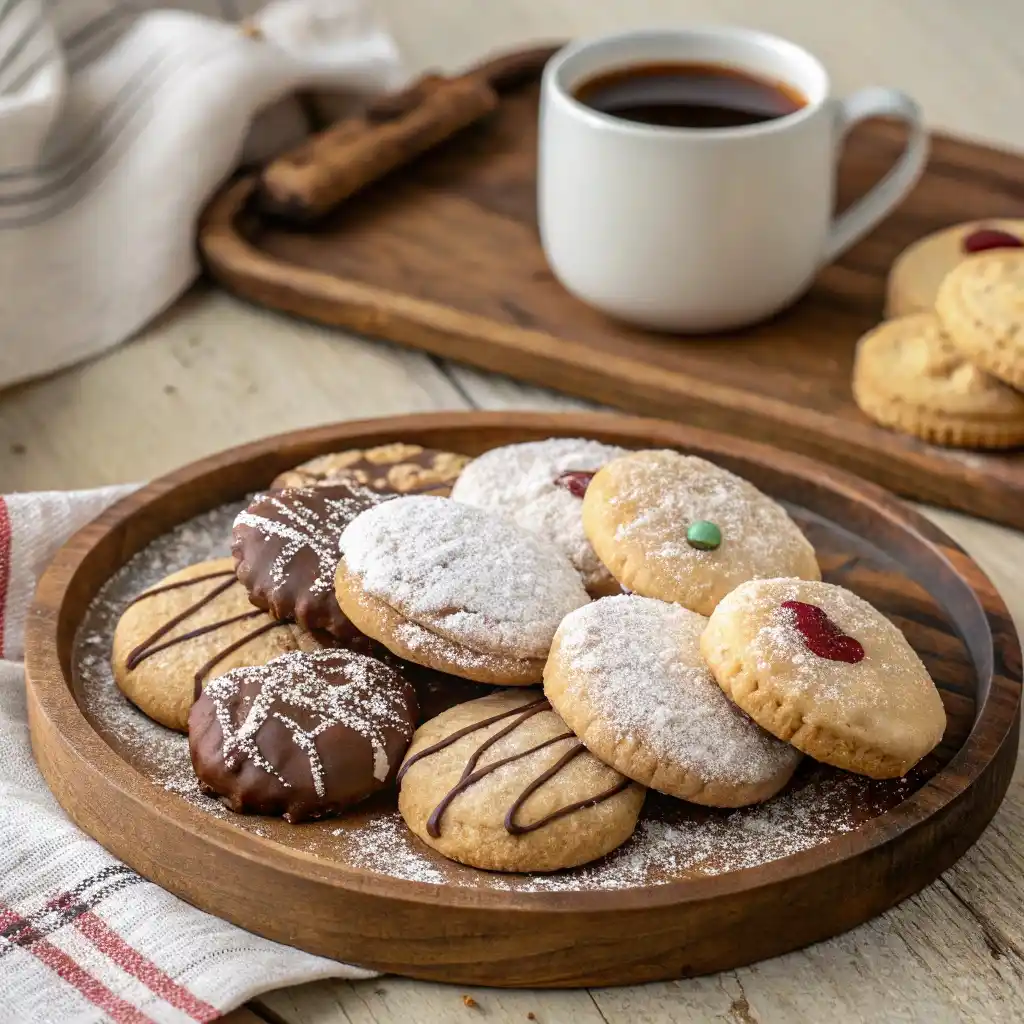
Moulded cookies are a delightful blend of art and baking. These cookies stand out because they are hand-shaped, pressed, or moulded before baking, resulting in beautifully designed treats with a unique texture and flavour. From classic peanut butter cookies to intricate shortbread patterns, moulded cookies allow bakers to show off their creativity.
In this guide, we’ll explore everything you need to know about making moulded cookies, from essential ingredients to expert shaping techniques. Whether you’re a beginner or an experienced baker, mastering the art of moulded cookies will elevate your baking game and impress anyone who takes a bite! 🍪✨
Introduction: The Allure and Versatility of Molded Cookies
Moulded cookies are a favourite for many bakers because they offer endless design possibilities. Unlike drop or rolled cookies, these treats require a bit of hands-on shaping, making them perfect for festive occasions, gift-giving, or everyday baking.
What Makes Molded Cookies Special?
1✅ Creative Designs – Molded cookies can be shaped by hand, pressed with stamps, or placed in cookie moulds to create beautiful textures.
2✅ Unique Textures – Because they’re shaped before baking, moulded cookies tend to have a firm, buttery bite with a slightly crisp exterior.
3✅ Customizable Flavors – From vanilla and almond to spiced gingerbread, the dough can be flavoured to match any occasion.
4✅ Holiday Favorites—Many traditional holiday cookies, such as spritz cookies or peanut butter blossoms, are moulded cookies.
Moulded cookies are versatile, fun to make, and a joy to eat. Now, let’s get started with the perfect classic moulded cookie recipe!
Recipe: How to Make Classic Molded Cookies from Scratch
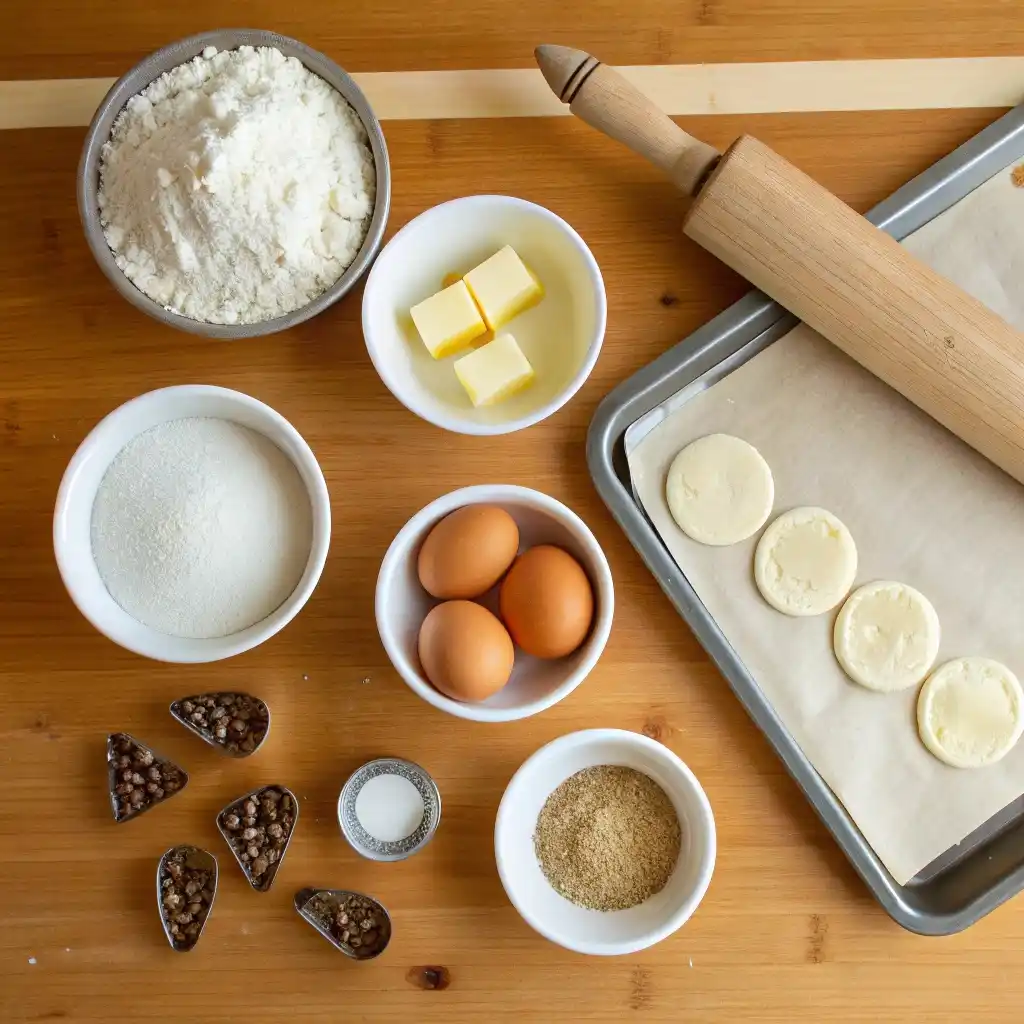
A great moulded cookie starts with the right ingredients and tools. Below, we’ll walk you through a simple yet delicious moulded cookie recipe that serves as a perfect base for endless variations.
Essential Ingredients and Tools for Perfect Molded Cookies
Ingredients
| Ingredient | Quantity | Purpose |
|---|---|---|
| Unsalted Butter | 1 cup (2 sticks) | Provides a rich, buttery texture |
| Granulated Sugar | ¾ cup | Adds sweetness and light crispness |
| Brown Sugar | ¼ cup | Adds moisture and a slight chewiness |
| Egg | 1 large | Binds the ingredients together |
| Vanilla Extract | 1 teaspoon | Enhances the flavor |
| All-Purpose Flour | 2 ¼ cups | Creates structure for shaping |
| Baking Powder | ½ teaspoon | Helps with slight puffing |
| Salt | ¼ teaspoon | Balances the sweetness |
| Optional Add-ins (e.g., cinnamon, almond extract, or lemon zest) | As desired | Adds extra flavor |
Tools Needed
✅ Mixing Bowls – For combining ingredients.
✅ Electric Mixer – Helps cream butter and sugar for the best texture.
✅ Cookie Molds or Stamps – To create decorative patterns.
✅ Baking Sheet – Lined with parchment paper or a silicone baking mat.
✅ Measuring Cups & Spoons – Ensures accurate ingredient ratios.
✅ Rolling Pin (Optional) – If using cookie cutters for shaping.
Step-by-Step Instructions for Shaping and Baking Molded Cookies
Step 1: Cream the Butter and Sugar
In a large bowl, beat the butter, granulated sugar, and brown sugar together until light and fluffy (about 2 minutes). This step helps create a tender and delicate texture.
Step 2: Add the Egg and Vanilla
Mix in the egg and vanilla extract, beating until fully incorporated. If using flavour add-ins (like almond extract or lemon zest), stir them in at this stage.
Step 3: Combine Dry Ingredients
Whisk the flour, baking powder, and salt together in a separate bowl. Slowly add this mixture to the wet ingredients, mixing quickly until a soft dough forms.
Step 4: Chill the Dough
Wrap the dough in plastic wrap and refrigerate for at least 30 minutes. Chilling prevents the cookies from spreading too much while baking and makes shaping easier.
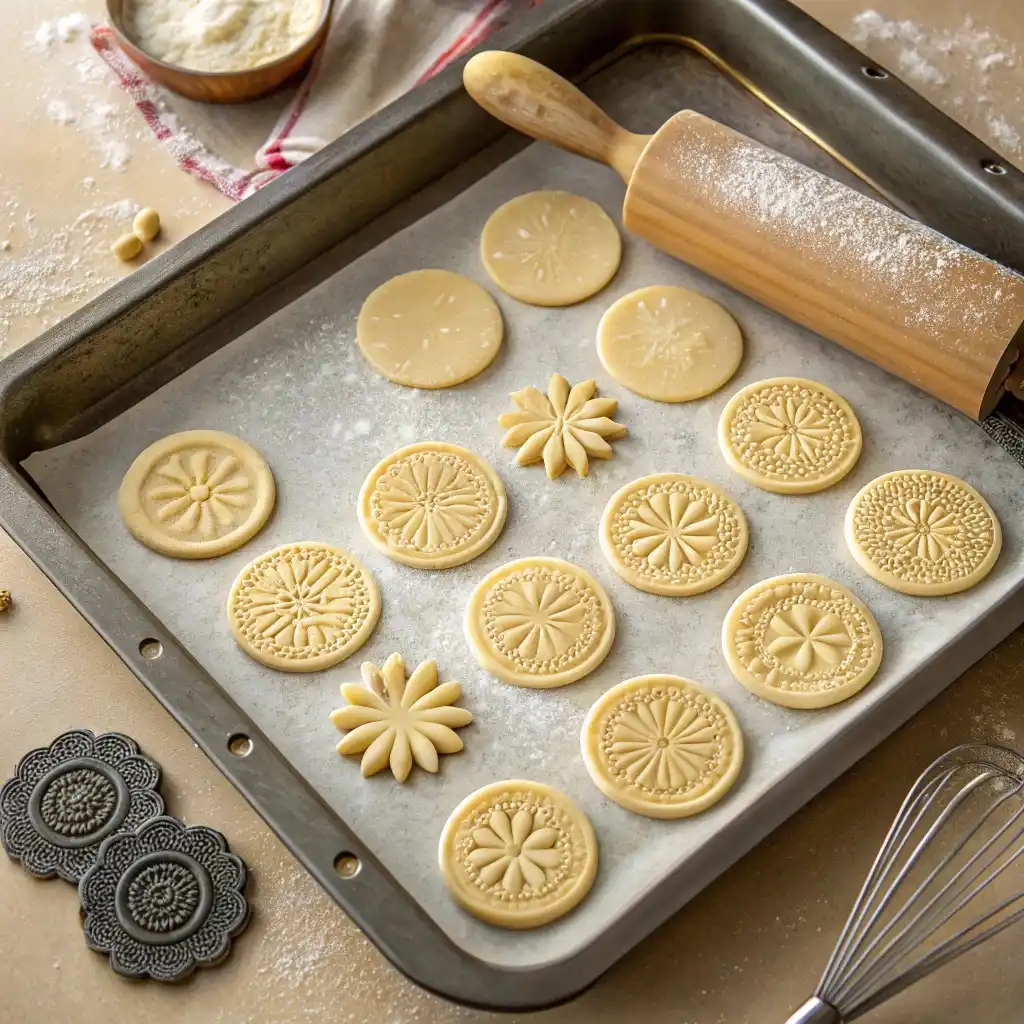
Step 5: Shape the Cookies
Now comes the fun part—moulding the cookies! Here are some techniques:
✅ Hand-Shaped – Roll small portions into balls and flatten slightly with your palm or fork (like peanut butter cookies).
✅ Cookie Stamps – Press a patterned stamp into each dough ball to create beautiful designs.
✅ Cookie Molds – Press dough into decorative moulds, then gently remove before baking.
Step 6: Bake to Perfection
Preheat the oven to 350°F (175°C). Place cookies on a lined baking sheet, spacing them about 1 inch apart.
✅ Baking Time: 10-12 minutes, or until edges turn lightly golden.
✅ Cooling: Let cookies sit on the baking sheet for 5 minutes before transferring to a wire rack.
Expert Tips for Achieving Consistent Texture and Unique Designs
✅ Chill the Dough – This prevents excess spreading and helps maintain intricate designs.
✅ Use Even Pressure – When pressing cookies, apply even pressure for a consistent look.
✅ Don’t Overbake – Remove cookies just as the edges turn golden to keep them tender.
✅ Experiment with Flavors – Try cocoa powder, cinnamon, or almond extract for a twist!
Conclusion: Mastering Molded Cookies for Baking Success
Moulded cookies are not just treats—they’re works of art. Whether you prefer simple hand-rolled shapes or intricate stamped designs, these cookies offer endless possibilities for creativity.
By following this guide, you’ll be able to:
✅ Create beautifully shaped cookies that hold their form.
✅ Experiment with flavours and decorations to match any occasion.
✅ Master essential techniques for the perfect texture and consistency.
Now, grab your favourite cookie mould, roll up your sleeves, and start baking delicious moulded cookies today! 🍪✨
Common Problems and Solutions in Molded Cookies Baking
Even experienced bakers encounter issues when making moulded cookies. Dough consistency, shaping difficulties, and adjustments in baking can affect the final result. But don’t worry! With a few expert tips and troubleshooting solutions, you can create perfectly shaped, beautifully textured moulded cookies every time.
Troubleshooting Dough Consistency and Shaping Challenges
Moulded cookies rely on a dough firm enough to hold its shape but soft enough to mould easily. You might struggle with shaping and consistency if your dough feels too dry, sticky, or crumbly.
Common Issues and Fixes
| Problem | Cause | Solution |
|---|---|---|
| The dough is too dry and crumbly | Too much butter or sugar or dough not chilled properly | Chill the dough for at least 30 minutes before shaping. Dust hands lightly with flour. |
| The dough is too firm to shape | Not enough fat, too much flour, or overmixing | Add 1 teaspoon of milk or melted butter at a time until the dough softens. |
| Dough spreads too much when baking | Too much butter or sugar, or dough not chilled properly | Refrigerate the dough for at least 1 hour before baking. Use parchment paper instead of greasing the baking sheet. |
| Dough is too firm to shape | Too cold or too much flour | Let the dough sit at room temperature for 5-10 minutes to soften slightly. Gently knead it before shaping. |
🔹 Pro Tip: Always measure ingredients accurately using a kitchen scale to ensure proper dough consistency.
Preventing Cracks and Breakage: Best Practices in Handling Dough
Cracked, broken, or uneven cookies can be frustrating, especially when using intricate moulds or stamps. Proper handling of the dough prevents cracks and ensures even textures.
How to Avoid Cracks in Molded Cookies
✅ Use Room-Temperature Dough for Shaping – If the dough is too cold, it may crack when pressed into moulds. Let it soften slightly before working with it.
✅ Apply Even Pressure – When pressing dough into moulds or using stamps, apply consistent, gentle pressure to avoid uneven cracks.
✅ Don’t Overwork the Dough – Kneading too much can develop gluten, making the dough stiff and prone to cracking. Mix just until combined.
✅ Keep the Dough Moist – If cracks appear, lightly dampen your fingertips with water and smooth out the surface before baking.
✅ Check Your Fat-to-Flour Ratio – If cookies crack while baking, the dough might need a little more fat to improve flexibility. Try adding an extra teaspoon of butter next time.
🔹 Pro Tip: If using intricate cookie moulds, lightly dust them with flour or powdered sugar to prevent sticking and help achieve clean, sharp designs.
Adjusting Baking Times for Consistent Results
Moulded cookies can be tricky to bake because they don’t always spread like traditional cookies. Baking times must be adjusted based on dough thickness, oven type, and desired texture.
How to Ensure Even Baking Every Time
✅ Follow the Recipe’s Recommended Time – Start with the lowest baking time listed, checking for doneness.
✅ Use an Oven Thermometer – Oven temperatures can vary! Ensure yours is accurate by using an oven thermometer and adjusting accordingly.
✅ Space Cookies Even on the Baking Sheet – Place cookies at least 1 inch apart to allow for even heat circulation.
✅ Rotate the Baking Sheet Halfway Through – This helps prevent uneven browning, especially if your oven has hot spots.
✅ Look for Visual Cues – Molded cookies are done when:
🔹 Edges turn lightly golden (for crisp cookies).
🔹 Center looks set but not too dry (for softer cookies).
Common Baking Problems and Fixes
| Problem | Cause | Solution |
|---|---|---|
| Cookies are too pale | Underbaked, oven temp too low | Bake 1-2 minutes longer or increase temp by 5°F. |
| Cookies are too hard or dry | Overbaked, too much flour | Remove cookies when edges are just golden. Reduce baking time by 1-2 minutes next time. |
| Cookies are unevenly baked | Hot spots in the oven, incorrect spacing | Remove cookies when the edges are just golden. Reduce baking time by 1-2 minutes next time. |
🔹 Pro Tip: Let cookies cool on the baking sheet for 5 minutes before transferring them to a wire rack. This prevents breakage while still allowing gentle carryover cooking.
Mastering moulded cookies takes patience, precision, and practice. By adjusting your dough consistency, shaping with care, and fine-tuning baking times, you’ll be able to create cookies that are flawless in texture, rich in flavour, and stunning in presentation. Happy baking! 🍪✨
Creative Variations and Serving Suggestions for Molded Cookies
Molded cookies are a delightful blend of creativity and tradition. While their unique shapes make them visually stunning, flavour enhancements, festive themes, and serving ideas can take them to the next level. Whether you want to impress guests at a holiday gathering or add a personal touch to your cookie platter, these creative variations and serving suggestions will inspire you!
Enhancing Flavors with Toppings, Glazes, and Mix-Ins
Moulded cookies provide the perfect base for experimenting with different flavours and textures. With just a few additions, you can create rich, complex, and truly unique cookies.
Toppings for Added Texture and Taste
1✅ Sugar Crystals & Sprinkles – Add a crunchy, decorative touch by rolling cookies in coarse sugar before baking.
2✅ Chopped Nuts – Press finely chopped almonds, pecans, or hazelnuts into the dough for a nutty bite.
3✅ Cinnamon Sugar Coating – Toss warm cookies in a cinnamon-sugar blend for a spiced finish (perfect for fall treats!).
4✅ Chocolate Drizzle – Melted dark, milk, or white chocolate drizzled over cooled cookies adds richness.
Glazes & Frostings for a Flavor Boost
Glazing moulded cookies enhance both their flavour and appearance. A simple glaze can add sweetness and shine without overpowering the cookie’s natural taste.
| Glaze/Frosting | Flavor Profile | Best Pairings |
|---|---|---|
| Vanilla Glaze | Light, sweet | Butter cookies, shortbread-style cookies |
| Lemon Glaze | Tangy, citrusy | Almond or poppy seed cookies |
| Espresso Drizzle | Rich, bold | Chocolate or mocha-flavored cookies |
| Maple Glaze | Warm, caramel-like | Cinnamon or pecan cookies |
🔹 Pro Tip: For extra flavour depth, try brushing warm cookies with flavoured syrups (such as honey or maple) before glazing.
Mix-Ins for a Unique Twist
Add flavorful mix-ins before shaping if you prefer to enhance the cookie dough.
1✅ Zested Citrus Peels – Orange or lemon zest brightens vanilla-based cookies.
2✅ Spices – A dash of nutmeg, cardamom, or allspice can create a cosy, aromatic experience.
3✅ Coconut Flakes – A great addition to tropical-inspired cookies.
4✅ Mini Chocolate Chips – For a fun surprise inside every bite!
Seasonal and Themed Molded Cookies for Every Occasion
Moulded cookies can be customized to match any holiday or event, making them the perfect edible gift or festive dessert centrepiece.
Winter & Holiday Molded Cookies ❄️
1✅ Gingerbread Stars – Use a star mould and add molasses & cinnamon for a classic holiday flavour.
2✅ Peppermint Swirls – Infuse dough with peppermint extract and dip in melted chocolate.
3✅ Snowflake Cookies – Decorate with powdered sugar or royal icing for a frosty look.
🔹 Serving Idea: Arrange holiday cookies in a tin with parchment paper for a homemade gift idea!
Spring & Summer Molded Cookies 🌸🌞
1✅ Lemon Blossom Cookies – Press dough into flower-shaped moulds and glaze with lemon icing.
2✅ Butterfly Shortbread – Add lavender or honey to shortbread dough for a delicate floral taste.
3✅ Tropical Coconut Cookies – Mix toasted coconut and lime zest for a refreshing summer treat.
🔹 Serving Idea: Pair with iced tea or fruit sorbet for a light, summery dessert.
Halloween & Fall Molded Cookies 🎃🍂
1✅ Pumpkin Spice Cookies – Add pumpkin puree and cinnamon for a seasonal touch.
2✅ Black Cat Chocolate Cookies – Use cocoa powder and shape into spooky designs.
3✅ Maple Leaf Cookies – Infuse with maple syrup and pecans for an autumn-inspired cookie.
🔹 Serving Idea: Serve alongside a pumpkin spice latte or hot apple cider for a cosy treat.
Elegant Cookies for Weddings & Special Events 💍🎉
1✅ Almond Wedding Cookies – Lightly dust with powdered sugar for a delicate, elegant finish.
2✅ Rosewater Shortbread – Infuse dough with rosewater and cardamom for a floral, exotic touch.
3✅ Monogrammed Butter Cookies – Use letter molds to create personalized initials for events.
🔹 Serving Idea: Arrange these cookies on a tiered dessert stand for an eye-catching display.
Conclusion: Mastering the Art of Molded Cookies for Baking Success
Moulded cookies are more than just a baked treat—they’re a canvas for creativity. Whether adding exciting flavours, decorating for special occasions, or simply perfecting the texture, these cookies offer endless possibilities.
By experimenting with toppings, fillings, and glazes, you can make each batch unique. And with seasonal inspirations, moulded cookies become the perfect gift, celebration dessert, or cosy snack.
So grab your favourite cookie mould, roll out your dough, and start baking your way to beautifully crafted, delicious moulded cookies! 🍪✨
🔗 Want more baking inspiration? Check out Your Guide to Rolled Cookies: Crafting Perfect Cookies from Dough to Delicious Treats for more creative cookie ideas!