
Introduction: Why Chocolate-Covered Strawberries Are a Perfect Dessert
Chocolate-covered strawberries are the ultimate combination of elegance and simplicity. These bite-sized treats blend the natural sweetness of fresh strawberries with the rich, velvety texture of melted chocolate, creating a dessert that’s as beautiful as it is delicious. Whether for Valentine’s Day, a romantic date night, or just a sweet snack, they never fail to impress.
What makes them even better? They’re incredibly easy to make! With just a few ingredients and some simple steps, you can create a batch of gourmet-quality chocolate-covered strawberries right at home. In this guide, we’ll cover everything you need to know, from choosing the best ingredients to adding fun toppings for extra flavor and texture.
Choosing the Best Ingredients for Chocolate-Covered Strawberries
The key to making perfect chocolate-covered strawberries starts with selecting high-quality ingredients. Every element, from the strawberries to the chocolate, plays a crucial role in the final taste and texture.
Selecting the Freshest Strawberries
The best chocolate-covered strawberries start with fresh, ripe strawberries. Here’s what to look for:
✔ Bright Red Color – Choose strawberries that are evenly red without white or green patches near the stem. This ensures they’re sweet and fully ripe.
✔ Firm Texture – Avoid overly soft strawberries, as they may become mushy when dipped in warm chocolate.
✔ Green, Vibrant Leaves – Fresh strawberries have bright green leaves attached. If the leaves look wilted, the fruit is likely past its prime.
✔ Medium to Large Size – While all sizes work, larger strawberries are easier to dip and make a more striking presentation.
Before dipping, always wash and thoroughly dry your strawberries. Even a tiny bit of moisture can cause the chocolate to seize up, ruining the smooth coating.
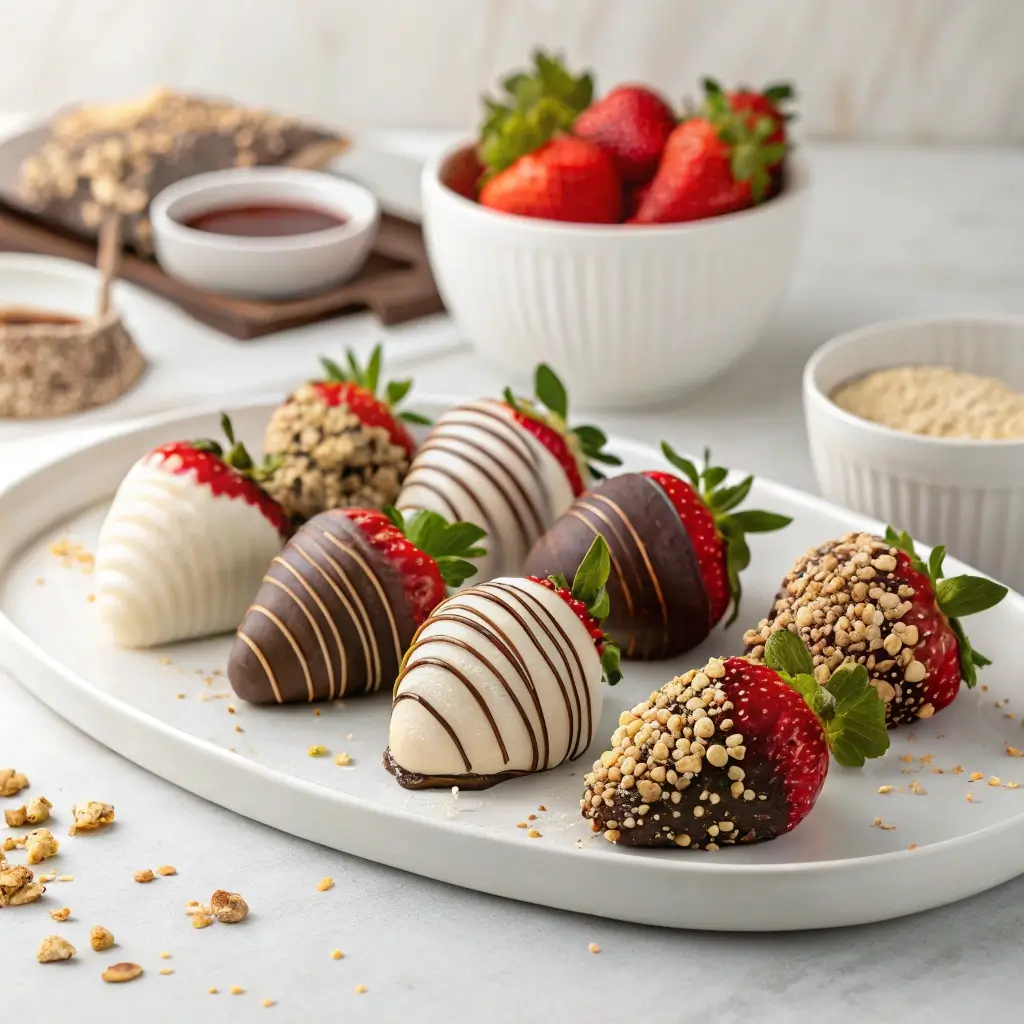
The Best Chocolate for Melting: Dark, Milk, or White?
Not all chocolate is created equal. The type you choose will affect the flavor, texture, and overall quality of your chocolate-covered strawberries.
🍫 Dark Chocolate – Ideal for those who love a rich, slightly bitter taste. It pairs beautifully with the natural sweetness of strawberries. Look for chocolate that’s at least 60% cocoa for the best results.
🍫 Milk Chocolate – A classic choice that offers a creamy, sweet flavor. If you prefer a smooth, mild taste, milk chocolate is a great option.
🍫 White Chocolate – While technically not “real” chocolate, white chocolate adds a creamy, buttery sweetness. It’s perfect for drizzling or creating contrast when paired with dark or milk chocolate.
Pro Tip: Always use high-quality chocolate bars or couverture chocolate instead of chocolate chips. Chips contain stabilizers that can affect the melting process and texture.
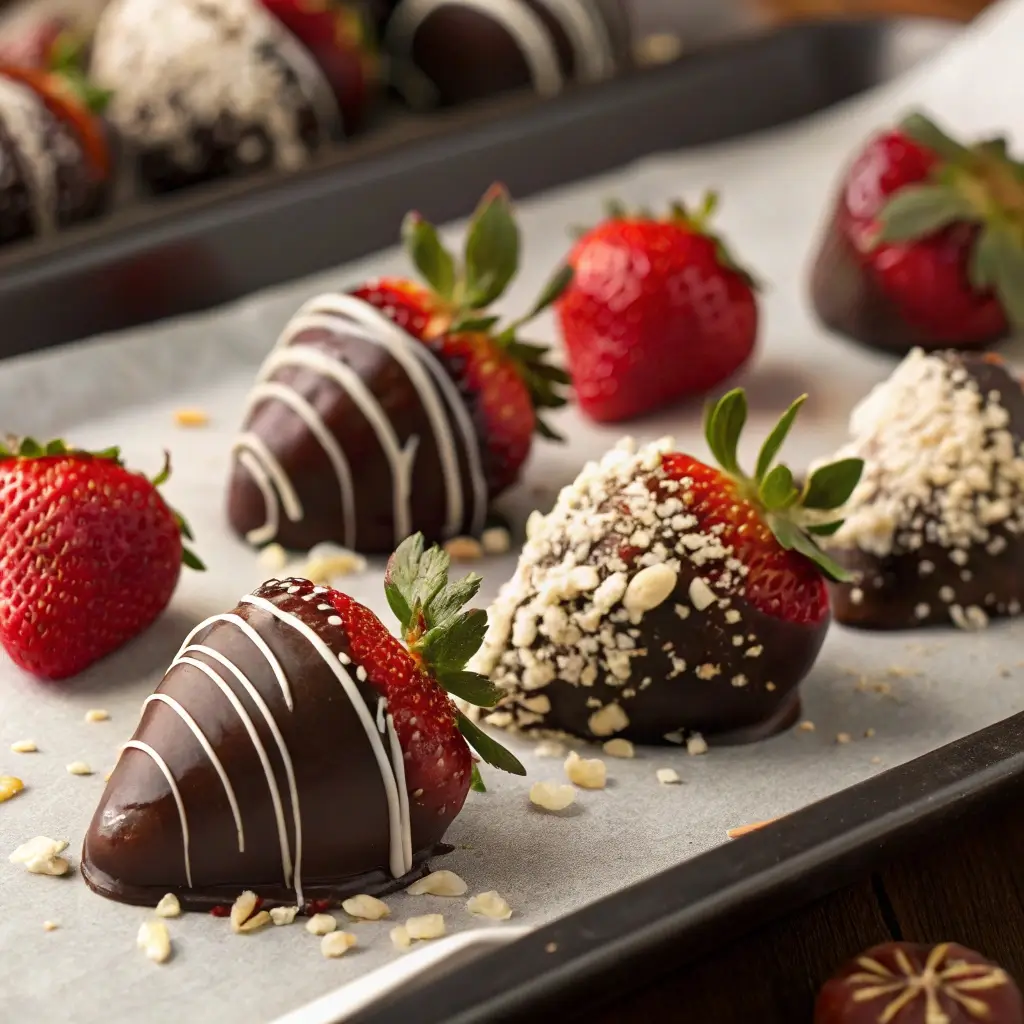
Optional Toppings for Extra Flavor and Texture
Want to take your chocolate-covered strawberries to the next level? Try adding fun toppings while the chocolate is still wet!
🌰 Chopped Nuts – Crushed almonds, pistachios, or pecans add a delightful crunch and nutty flavor.
🥥 Shredded Coconut – For a tropical twist, lightly coat your strawberries in unsweetened coconut flakes.
🍪 Cookie Crumbs – Crushed Oreos or graham crackers add a sweet, crumbly texture.
🍬 Sprinkles – A fun and colorful option, especially for holidays or celebrations.
🍫 Drizzled Chocolate – Use a contrasting chocolate (e.g., white chocolate over dark) for an elegant finishing touch.
Now that you’ve got the best ingredients, it’s time to put them together and create these delicious treats!
Step-by-Step Recipe: How to Make Perfect Chocolate-Covered Strawberries
Making chocolate-covered strawberries at home is easier than you think! With the right ingredients and techniques, you can create beautifully glossy, delicious treats in no time. Follow this step-by-step guide to ensure perfect results every time.
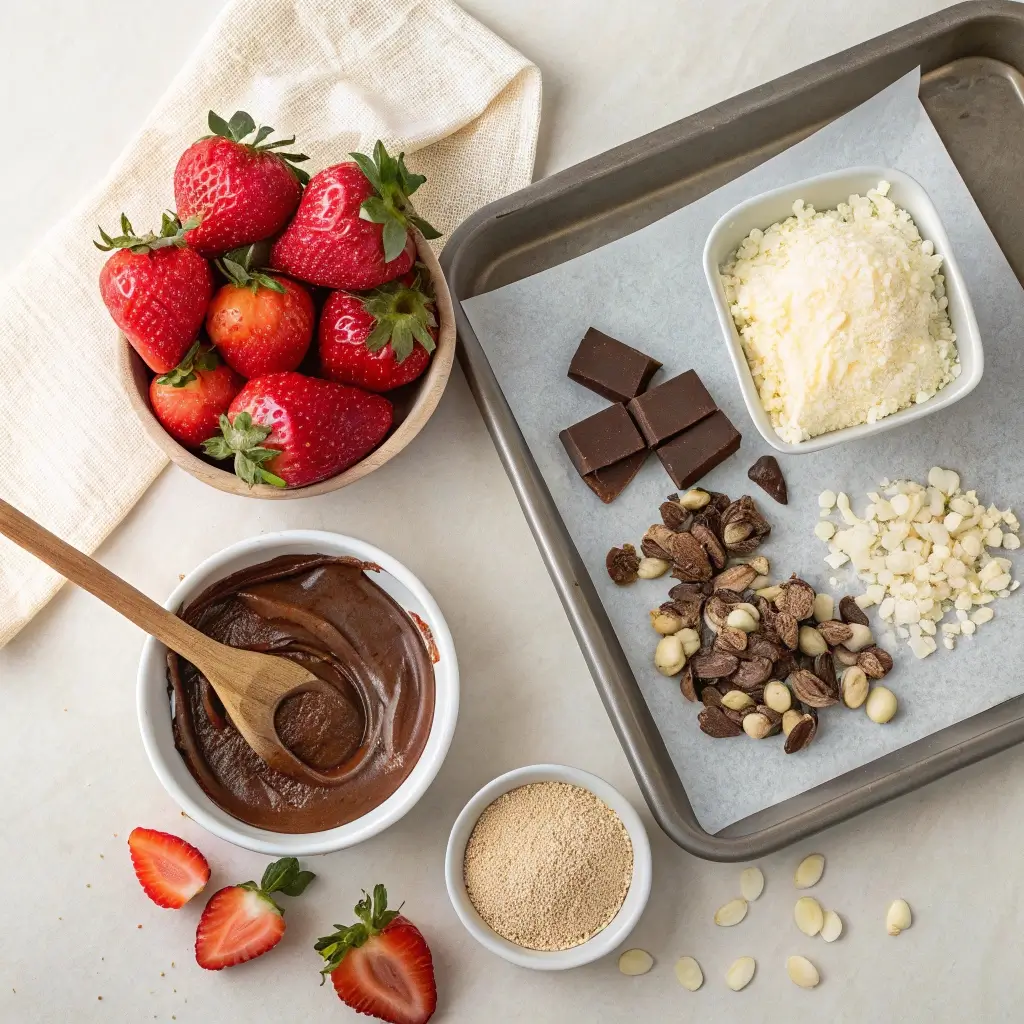
Ingredients List
To make about 12 chocolate-covered strawberries, you’ll need:
| Ingredient | Quantity |
|---|---|
| Fresh strawberries | 12 large |
| Dark, milk, or white chocolate (high-quality) | 6 oz (170g) |
| Coconut oil or butter (optional, for smoother texture) | 1 tsp |
| Chopped nuts, sprinkles, or shredded coconut (optional) | ¼ cup |
✔ Tip: Using high-quality chocolate (such as couverture chocolate or chocolate bars) instead of chocolate chips will give you a smoother and shinier finish.
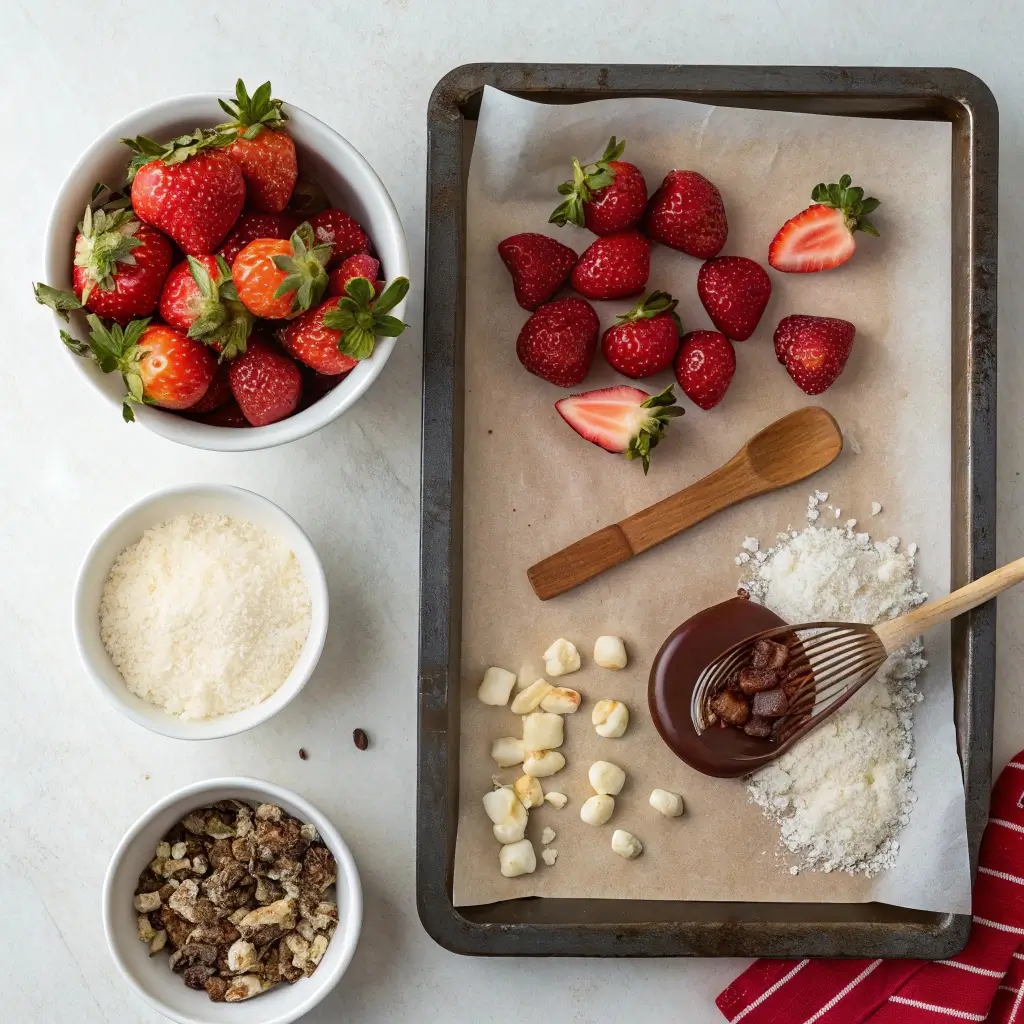
Step 1: Washing and Drying the Strawberries Properly
Before you even think about melting chocolate, it’s crucial to prepare your strawberries correctly.
- Rinse the Strawberries: Place your strawberries in a colander and rinse them under cold running water to remove any dirt or pesticides.
- Pat Dry Completely: Use a paper towel or clean kitchen towel to dry them thoroughly.
- Air Dry for Extra Crispness: Lay them on a dry paper towel and let them sit at room temperature for at least 30 minutes. Any moisture left on the strawberries will prevent the chocolate from sticking properly.
✔ Tip: Do not remove the green leaves! They add a natural handle, making dipping easier.
Step 2: Melting the Chocolate for a Smooth Coating
Now, let’s prepare the chocolate for dipping. You have two easy melting methods:
Microwave Method (Quick & Easy)
- Chop the Chocolate: Break the chocolate into small, even pieces for faster melting.
- Microwave in Intervals: Place the chocolate in a microwave-safe bowl and heat in 20-second intervals, stirring after each until smooth.
- Add Coconut Oil (Optional): Stir in 1 teaspoon of coconut oil to make the chocolate extra glossy and easy to work with.
Double Boiler Method (Best for Precision)
- Set Up a Double Boiler: Place a heatproof bowl over a saucepan with simmering water (not boiling). The bowl should not touch the water.
- Melt the Chocolate Gently: Stir continuously until the chocolate is fully melted and silky smooth.
- Keep Warm: Turn off the heat but leave the bowl over the warm water to keep the chocolate at the right consistency.
✔ Tip: Avoid getting any water into the chocolate—this can cause it to seize and become grainy.
Step 3: Dipping and Decorating the Strawberries
Now comes the fun part—coating and decorating your strawberries!
- Hold by the Green Stem: Grab each strawberry by the leaves for easy dipping.
- Dip in Chocolate: Submerge about ¾ of the strawberry into the melted chocolate, then lift and let the excess drip off.
- Twist for a Smooth Finish: Gently twist the strawberry as you pull it out for an even coating.
- Add Toppings Immediately: If using nuts, coconut, or sprinkles, roll or sprinkle them over the wet chocolate before it sets.
- Place on a Lined Tray: Arrange dipped strawberries on a baking sheet lined with parchment paper.
✔ Tip: Want an elegant drizzle effect? Melt a second type of chocolate and use a spoon or piping bag to drizzle over the dipped strawberries.
Step 4: Letting Them Set for the Perfect Finish
The final step ensures that your chocolate-covered strawberries have a firm, glossy coating.
- Let Them Rest at Room Temperature: Allow the strawberries to set naturally for 15 minutes before moving them.
- Chill for a Faster Set: If you need to speed up the process, place them in the refrigerator for 20-30 minutes, but avoid keeping them in too long to prevent sweating.
- Serve or Store Properly: Enjoy them immediately, or store them in an airtight container in the fridge for up to 24 hours.
✔ Tip: Avoid freezing! Chocolate-covered strawberries can develop a mushy texture when thawed.
Now, you have perfectly made chocolate-covered strawberries—crisp, sweet, and irresistibly smooth! 🍓🍫
Common Problems and Solutions When Making Chocolate-Covered Strawberries
Chocolate-covered strawberries are a simple yet elegant treat, but even the smallest mistakes can lead to frustrating results. Have you ever dipped a strawberry, only for the chocolate to slide right off? Or perhaps your chocolate turned grainy and unusable? Don’t worry! Here are the most common issues and how to fix them.
Chocolate Not Sticking? How to Ensure a Smooth Coating
One of the biggest frustrations when making chocolate-covered strawberries is when the chocolate doesn’t adhere properly. Instead of a smooth, glossy coating, it slides off or creates a patchy finish.
What’s Causing It?
✔ Excess Moisture – If the strawberries are wet, chocolate won’t stick. Even a tiny amount of water can prevent a smooth coating.
✔ Cold Strawberries – If the strawberries are too cold, the chocolate may harden too quickly and create an uneven layer.
✔ Chocolate Too Thick – If the melted chocolate is too thick, it won’t coat the strawberries evenly.
How to Fix It:
✔ Thoroughly Dry the Strawberries – After washing, pat them dry with a paper towel and let them air dry for at least 30 minutes before dipping.
✔ Use Room-Temperature Strawberries – Avoid using cold strawberries straight from the fridge. Let them sit out for 10-15 minutes to reduce temperature shock.
✔ Thin the Chocolate If Needed – Add ½ teaspoon of coconut oil or vegetable oil to your melted chocolate for a smoother consistency.
Chocolate Seizing or Burning? Tips for Melting It Properly
Seized or burned chocolate is a nightmare! Instead of a silky, glossy texture, you end up with a thick, grainy mess. This usually happens due to overheating or moisture contamination.
What’s Causing It?
1 Overheating – Chocolate burns easily when exposed to high temperatures, especially in the microwave.
2 Water Contamination – Even a single drop of water (from steam or wet utensils) can cause chocolate to seize, making it clumpy and stiff.
3 Using Low-Quality Chocolate – Some chocolate chips contain stabilizers that make them harder to melt smoothly.
How to Fix It:
✔ Use the Right Melting Method – Melt chocolate slowly using a double boiler or microwave in 20-second intervals, stirring each time.
✔ Keep It Dry – Always use completely dry bowls and utensils. If using a double boiler, ensure that no water touches the chocolate.
✔ Revive Seized Chocolate – If your chocolate seizes, try adding ½ teaspoon of vegetable oil or warm milk and stirring vigorously. This may help bring it back to a smooth consistency.
Strawberries Getting Soggy? How to Keep Them Fresh and Firm
Nothing ruins chocolate-covered strawberries faster than mushy, leaking fruit. Soggy strawberries make the chocolate coating fall apart and lose their appealing texture.
What’s Causing It?
1 Improper Storage – Keeping strawberries in the fridge for too long can cause condensation, leading to sogginess.
2 Not Drying Them Properly – Even a little water left on the surface can make strawberries soften too quickly.
3 Dipping Overripe Strawberries – If the strawberries are already soft before dipping, they won’t hold up well under the chocolate.
How to Fix It:
✔ Use Fresh, Firm Strawberries – Choose bright red, plump strawberries with green leaves. Avoid mushy or bruised ones.
✔ Store Them Correctly – After dipping, let them set at room temperature for 15 minutes, then refrigerate for up to 24 hours. Keep them in a single layer on parchment paper to avoid moisture buildup.
✔ Avoid Freezing – Chocolate-covered strawberries should never be frozen, as thawing will cause the strawberries to become watery and ruin the chocolate shell.
With these tips, you can avoid the most common chocolate-covered strawberry mistakes and create perfectly coated, fresh, and delicious treats every time! 🍓🍫
Fun Variations to Try with Chocolate-Covered Strawberries
Chocolate-covered strawberries are already a delightful treat, but why stop at the basics? With a little creativity, you can transform them into gourmet desserts perfect for any occasion. Whether you want to add a bit of crunch, make them extra fancy, or surprise your guests with a hidden filling, these fun variations will take your chocolate-covered strawberries to the next level!
Drizzled Chocolate Designs for an Elegant Look
If you want your chocolate-covered strawberries to look as good as they taste, drizzling is the way to go. It adds a sophisticated touch and is incredibly easy to do!
How to Drizzle Chocolate Like a Pro
1 Melt a contrasting chocolate – If you’ve dipped your strawberries in dark chocolate, drizzle with white or milk chocolate for a beautiful contrast.
2 Use a spoon or piping bag – A spoon works fine, but for precise designs, fill a piping bag or a small zip-lock bag with melted chocolate, snip off a tiny corner, and drizzle back and forth.
3 Let It Set – After drizzling, place the strawberries on parchment paper and allow the chocolate to harden before serving.
Creative Drizzling Ideas
1🎨 Zig-Zag Patterns – Move your spoon or piping bag quickly from side to side for a fun look.
2🎨 Swirls & Spirals – Draw gentle circles over the strawberries for an elegant touch.
3🎨 Double-Dip & Drizzle – Dip the strawberry in one chocolate, let it set, then drizzle with a second type of chocolate for a striking contrast.
Drizzling chocolate is a simple but effective way to add flair and sophistication to your strawberries, making them look like they came straight from a gourmet chocolate shop!
Adding Nuts, Coconut, or Sprinkles for Extra Crunch
If you love texture in your desserts, coating your chocolate-covered strawberries with crunchy toppings will add that extra dimension of flavor and fun.
Best Toppings for Chocolate-Covered Strawberries
1 Chopped Nuts – Almonds, pecans, hazelnuts, or peanuts add a delightful crunch. Toast them beforehand for an even richer flavor.
2 Shredded Coconut – Unsweetened coconut flakes bring a tropical twist to your strawberries.
3 Sprinkles – Colorful sprinkles make them extra fun for birthdays, holidays, or celebrations.
4 Crushed Cookies – Oreo crumbs, graham crackers, or shortbread add a sweet, crunchy layer.
5 Crushed Candy Canes – Perfect for a festive holiday touch.
How to Add Toppings Properly
1️⃣ Dip the strawberry in melted chocolate.
2️⃣ Immediately roll or sprinkle toppings before the chocolate hardens.
3️⃣ Let them set on parchment paper.
This method ensures the toppings stick properly and create a deliciously crunchy, flavorful bite.
Stuffed Chocolate-Covered Strawberries for a Gourmet Twist
Want to go beyond the usual chocolate coating? Stuffed chocolate-covered strawberries are a game-changer! These take your dessert to another level of decadence with a creamy or sweet surprise inside.
Filling Ideas for Stuffed Strawberries
1 Cheesecake Filling – Mix cream cheese, powdered sugar, and vanilla extract for a creamy, tangy center.
2 Nutella or Peanut Butter – A smooth, nutty surprise inside complements the chocolate perfectly.
3 Whipped Cream – Light and fluffy, this filling adds a soft texture inside the juicy strawberry.
4 Caramel or Dulce de Leche – A sweet, gooey caramel center makes these strawberries irresistible.
How to Make Stuffed Chocolate-Covered Strawberries
1️⃣ Hollow Out the Strawberry – Use a small knife or melon baller to scoop out a small section from the top.
2️⃣ Pipe in the Filling – Fill a piping bag or use a small spoon to add your chosen filling.
3️⃣ Dip in Chocolate – Carefully dip the stuffed strawberry in melted chocolate, ensuring the filling stays inside.
4️⃣ Let Set and Enjoy! – Allow the chocolate to harden before serving.
Stuffed chocolate-covered strawberries are a crowd-pleasing surprise and a fantastic way to turn an already delicious treat into something even more special!
Conclusion: Enjoying and Storing Your Homemade Chocolate-Covered Strawberries
Now that you’ve mastered chocolate-covered strawberries, it’s time to enjoy them! Whether you stick with the classic dipped version or try fun variations like drizzled designs, crunchy toppings, or stuffed fillings, these treats are guaranteed to impress.
How to Serve Chocolate-Covered Strawberries
1🍓 Best Served Fresh – Enjoy them within 24 hours for the best texture and flavor.
2🍓 Perfect for Special Occasions – Serve them at birthdays, date nights, Valentine’s Day, or as a fancy dessert platter.
3🍓 Pair with Drinks – They go great with champagne, coffee, or a glass of milk!
How to Store Chocolate-Covered Strawberries Properly
1 Refrigerate in a Single Layer – Place them in an airtight container, but avoid stacking them to prevent sticking.
2 Use Parchment Paper – Line the container with parchment paper to prevent moisture buildup.
3 Avoid Freezing – Freezing will cause the strawberries to become watery when thawed, ruining their texture.
By following these tips, your homemade chocolate-covered strawberries will stay fresh, beautiful, and delicious until you’re ready to indulge.
Now, it’s time to get creative and start making your own chocolate-covered strawberry masterpieces! 🍓🍫
Want More Cooking Inspiration?
What Does Strawberry Cheesecake Taste Like? An Irresistible Dessert Guide
The Best Strawberry Crunch Cookies: Crispy, Buttery & Irresistible